- I have a couple (3) internal websites that are being hosted on my server at home.
- These websites are accessible using Microsoft's AzureAD Application Proxy using my custom domain "yevrag35.com".
When using custom domain names with AzureAD AppProxy, you are responsible for providing your SSL certificate. Obviously, normal SSL certificates can cost an arm and a leg to procure, which is why the advent of Let's Encrypt has been a godsend. Let's Encrypt is made in a way to promote the automation of its use, seeing as their certificates are good for only 3 months at a time.
I'm going to show you a way to automate the enrolling and applying of Let's Encrypt-generated certificates for your AzureAD AppProxy-protected web applications.
Requirements
- An Azure DNS zone for your custom domain, with dns delegation in place. (I pay $0.51 USD/month for my Azure DNS zone. A lot more economical than purchasing a certificate.)
- Azure AD Premium P1 licensing, which you'd have to have to do AppProxy in the first place.
- PowerShell v5.0 (or higher)
- The PowerShell module "AzureAD" (as of this post, I was using version 2.0.1.16)
- 2 of the AzureRM PowerShell modules: "AzureRM.Profile" and "AzureRM.Resources". (I'm using v5.3.3 and v6.2.1 respectively)
- An advanced text editor (I'll be using Visual Studio Code v1.27.1)
- The latest release of PKISharp's win-acme program. (I'm using v1.9.11.2)
Azure AD App Registration
To facilitate the enrolling/renewing of Let's Encrypt certificates, we need to create an app registration in our Azure tenant. This enterprise application will be responsible for the creation of TXT records in our Azure DNS zone (which you'll see why in a bit). While you could get away with using one of the built-in Azure permissions roles for the application, I'm going to show you how to give the app the minimum necessary permissions in order for it to do its job.
To create the DNS application, head to "https://portal.azure.com" and go to the "App registrations" blade. Click "New application registration" once there.
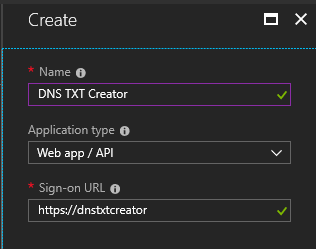 Fill in the name and the sign-on url of the app. The sign-on url does not have to be internet accessible nor does it need to actually exist.
After creating it, Azure may bring you back to the App registrations page, but the app is missing. Some dumb Azure setting only shows you "My apps" by default and because we haven't added any owners yet it does not show up in our list. Next to the search box, click the drop-down and select "All apps" instead. Then proceed to click the newly-created app.
Under the registered app, make note of the Application ID as we'll need it later. For now, click "Settings => Owners", and add yourself as the app's owner.
Next, we'll set up a "secret" password for use when authenticating with the app. Click "Keys" and under "Passwords", type in the first box "Azure Secret", change the duration to "Never expires", and then click "Save".
Next, we'll set up a "secret" password for use when authenticating with the app. Click "Keys" and under "Passwords", type in the first box "Azure Secret", change the duration to "Never expires", and then click "Save".

That's all we'll need for now with the app. Now let's give it the minimum permissions.
Registered App Permissions
We'll need our Azure Subscription Id, so before we go any further, let's grab that.
Either go to the "Subscriptions" blade in the Azure portal or log in to Azure via PowerShell:
Import-Module AzureRM.profile
$con = Login-AzureRmAccount
$con.Context.Subscription.SubscriptionId | Set-Clipboard
Now, let's fire up our advanced text editor as we're going to create our permission Role Definition for Azure. The role definition must be in JSON format, so I'll call the file "dns-text-creator.json".
This will be the contents of said file:
 {
   "Name": "DNS TXT Creator",
   "IsCustom": true,
   "Description": "Reads Azure DNS zones for dns validation tests for Let's Encrypt.",
   "Actions": [
     "Microsoft.Network/dnszones/TXT/delete",
     "Microsoft.Network/dnszones/TXT/write"
   ],
   "NotActions": [],
   "DataActions": [],
   "NotDataActions": [],
   "AssignableScopes": [
     "/subscriptions/xxxxxxxx-xxxx-xxxx-xxxx-xxxxxxxxxxxx"
   ]
 }
* Replace 'xxxxxxxx-xxxx-xxxx-xxxx-xxxxxxxxxxxx' with the Azure Subscription Id you retrieved before. *
As you can see, I'm only giving the application the ability to "write" and "delete" TXT records in my Azure DNS zones. Now, we need to upload this role definition to Azure. To do this, we'll use the AzureRM PowerShell modules again:
When the command has finished running, it will display the result output. Make note of the role definition's "Id". If you ever want to edit the role again, simply add the following after the "Name" line:
And use:
Now, we'll apply the new role definition to the application to grant it those specific permissions:
The service principal name is the "sign-on url" we specified when creating the app registration initially.
So now our app is made and has the necessary permissions. Next, we'll set up the "letsencrypt.exe" from "win-acme".
As you can see, I'm only giving the application the ability to "write" and "delete" TXT records in my Azure DNS zones. Now, we need to upload this role definition to Azure. To do this, we'll use the AzureRM PowerShell modules again:
 Import-Module AzureRm.profile, AzureRm.Resources
 Login-AzureRmAccount
 New-AzureRmRoleDefinition -InputFile "dns-text-creator.json"
When the command has finished running, it will display the result output. Make note of the role definition's "Id". If you ever want to edit the role again, simply add the following after the "Name" line:
"Id": "xxxxxxxx-xxxx-xxxx-xxxx-xxxxxxxxxxxx",
And use:
Set-AzureRmRoleDefinition -InputFile "dns-txt-creator.json"
Now, we'll apply the new role definition to the application to grant it those specific permissions:
New-AzureRmRoleAssignment -ServicePrincipalName "https://dnstxtcreator" -Scope "/subscriptions/xxxxxxxx-xxxx-xxxx-xxxx-xxxxxxxxxxxx" -RoleDefinitionName "DNS TXT Creator"
The service principal name is the "sign-on url" we specified when creating the app registration initially.
So now our app is made and has the necessary permissions. Next, we'll set up the "letsencrypt.exe" from "win-acme".
"letsencrypt.exe" Configuration
The win-acme project utilizing let's encrypt provides a command-based interface for generating your certificates. One of the options to enroll and register certificates is using Azure DNS validation. It requires the app registration we created earlier in order to create and delete TXT records in our Azure DNS zone automatically, which prove ownership over our domains.
After downloading the latest release, go to your "win-acme" folder you extracted, find the "settings_default.config" file, and open it in our advanced text editor. You'll notice it's just an XML file with various settings. We only need to modify a few of them.
After downloading the latest release, go to your "win-acme" folder you extracted, find the "settings_default.config" file, and open it in our advanced text editor. You'll notice it's just an XML file with various settings. We only need to modify a few of them.
Change the following settings:
- CertificatePath -- make this value a folder under your extracted "win-acme" folder.
- example: <value>C:\letsencrypt\certs</value>
- ConfigurationPath -- make this value a folder under your extracted "win-acme" folder.
- example: <value>C:\letsencrypt\config</value>
- CertificateStore -- I would specify "My" only, which is synonymous with the Personal cert store.
- example: <value>My</value>
- PFXPassword
- example: <value>LetsEncrypt#1!</value>
Enroll a Certificate and Apply to AppProxy-Website
Now, that we have all of our prerequisites done, let's test it out. I've written a simple script to perform this task for us. What we'll need:
- Name of the Web App
- in our test case here, it'll be "Test Site"
- Hostname on the certificate
- in our test case, it'll be "https://testsite.mysite.com"
- Path to "letsencrypt.exe"
- we'll default it to C:\letsencrypt\letsencrypt.exe
- Azure Resource Group Name
- this is the Resource Group that contains the Azure "DNS Zones".
- DNS App Registration ApplicationId
- if not provided as a parameter, we'll prompt for it.
- DNS App Registration Secret Password
- if not provided as a parameter, we'll prompt for it.
- Password for the PFX files
- This is the same password as what's in the "settings_default.config" file that we specified. If not provided as a parameter, we'll prompt for it.
Here's the script:
 #Requires -Modules AzureAD, AzureRm.profile, AzureRm.Resources -RunAsAdministrator
 [CmdletBinding(PositionalBinding=$false)]
 param
 (
   [parameter(Mandatory=$true,Position=0)]
   [string] $HostName,
   [parameter(Mandatory=$true,Position=1)]
   [string] $WebsiteAppName,
   [parameter(Mandatory=$true,Position=2)]
   [alias("AzureCredentials")]
   [pscredential] $Credential,
   [parameter(Mandatory=$false,Position=3)]
   [guid] $DnsTxtCreatorAppId,
   [parameter(Mandatory=$false)]
   [securestring] $DnsTxtCreatorAppSecret,
   [parameter(Mandatory=$true)]
   [string] $ResourceGroupName,
   [parameter(Mandatory=$true)]
   [string] $PfxDirectory,
   [parameter(Mandatory=$false)]
   [securestring] $PfxPassword,
   [parameter(Mandatory=$false)]
   [string] $LetsEncryptExe = "C:\letsencrypt\letsencrypt.exe"
 )
 # If AppId and AppSecret are not specified, prompt for them.
 if (!$PSBoundParameters["DnsTxtCreatorAppSecret"])
 {
   if ($PSBoundParameters["DnsTxtCreatorAppId"])
   {
     $appCreds = Get-Credential $DnsTxtCreatorAppId
   }
   else
   {
     $appCreds = Get-Credential -Message "Put the AppId in the UserName field:"
   }
 }
 if ($null -eq $appCreds.Password)
 {
   throw "App authentication cancelled."
 }
 # If PfxPassword was not specified, prompt for it
 if (!$PSBoundParameters["PfxPassword"])
 {
   $cred = Get-Credential "DOESN'T MATTER"
   if ($null -eq $cred.Password)
   {
     throw "User cancelled authentication."
   }
   else
   {
     $PfxPassword = $cred.Password
   }
 }
 # Login to AzureRM to get Tenant and Subscription Id's
 Login-AzureRmAccount -Credential $Credential -ea Stop > $null
 $azureCon = Get-AzureRmSubscription
 $tenantId = $azureCon.TenantId
 $subId = $azureCon.SubscriptionId
 Disconnect-AzureRmAccount > $null
 # Login to AzureAD
 Connect-AzureAD -Credential $Credential -ea Stop > $null
 # Get 'real' ObjectId of website
 $webAppId = (Get-AzureADApplication -SearchString $WebsiteAppName -ea Stop).ObjectId
 # Generate Let's Encrypt certificate
 . $LetsEncryptExe `
   --plugin manual `
   --manualhost $HostName `
   --validation azure `
   --validationmode 'dns-01' `
   --azuretenantid $tenantId `
   --azureclientid $appCreds.UserName `
   --azuresecret $appCreds.GetNetworkCredential().Password `
   --azuresubscriptionid $subId `
   --azureresourcegroupname $ResourceGroupName
 Start-Sleep -Seconds 5
 # Now import pfx to Azure for WebApp to use.
 Set-AzureADApplicationProxyApplicationCustomDomainCertificate `
   -ObjectId $webAppId `
   -PfxFilePath "$PfxDirectory\$HostName-all.pfx" `
   -Password $PfxPassword
With this setup, when Win-ACME runs the renewal and updates the local server's TLS cert, will that also push the new cert to Azure Application Proxy? Or will I still need to export the cert as a PFX file and upload it to Azure Application Proxy?
ReplyDeleteSo yes, this process would update the AppProxy certificate. Microsoft *still* does not allow service principals to update AppProxy certs, so it has to use a real user account.
DeleteI completely forgot about this post, but it should definitely be updated to use the Posh-ACME (https://www.powershellgallery.com/packages/Posh-ACME/3.6.0) PowerShell module.
Thank you. It looks like the "AzureAD.Profile" and "AzureAD.resources" files might not be a part of the AzureAD powershell module anymore (2.0.2.140). Are you still using this process to keep your App proxy web sites updated with Let's Encrypt?
Delete